Amulet Bag

By Marjie Brandeen
Supply List:
For fancy dangle embellishment, you will need:
Optional:
- O'So Sticky Tape cut to 1-1/2" wide x 4" long
- O'So Sticky tape, 1/8" wide
- Pennywise Arts Micro Beads
- Cardstock cut to a single 1/8" wide strip x at least 5" long
- Japanese Screw Punch and cutting mat. If you do not own a JSP, you can improvise with a fat needle and a thimble.
- Scissors
- Leafing (such as Amy's Magic Leafing) - any color will work!
- Jump Rings
- Fine glitter, to coordinate with your Micro Bead colors
- Chain or necklace cording.
For fancy dangle embellishment, you will need:
- Needle Nose Pliers (jewelers size)
- 2" Head Pins (gold or silver, to match your jump rings)
- Seed Beads, colors of choice to compliment your beaded bag.
Optional:
- You will see that I have also incorporated confetti in some of mine. But even punched shapes (teeny tiny punch such as a hand-punch would produce) using metallic paper is lots of fun to use if you don't have confetti.


Note: Size taught was 1-1/2" x 4" but you can cut the O'So Sticky to any size you wish!
Directions:
Step 1:
You will begin by applying the leafing to one side of the O'So Sticky. Be careful with this step. If you pull off the entire paper liner all at once, you run the risk of it doubling over on itself and that will not be a good thing. Some of you may have a full square of the leafing, it all it's radiant & glorious design. It's very tricky to get a full sheet of leafing down in one shot because the O'So Sticky Tape will act like a magnet and suck that thing right out of your hands, usually cattywompus!
It is smarter to peel back just 1/3 of the paper liner and apply some leafing, peel down further and apply more, etc., until you have the entire length covered with leafing. This will become the inside of your beaded bag, eventually.
Note: If you do not have the leafing, you can use aluminum foil. It's not as luxurious but it works! You will need to trim the edges with scissors.
Rub the leafed O'So Sticky Tape with your fingers to get it smoothed and adhered well. Dust, rub, or pick off the leafing that is clinging to the edges.
Be SURE that you have the piece well covered with the leafing.
Step 2:
Set your O'So sticky piece aside for a moment as we talk about the designing phase. This is a very important "think" step.
Cut a piece of scrap paper the same size as your O'So Sticky Tape piece, 1-1/2" x 4". This is your mock-up of the purse. Play with this. Decide where your purse will fold over at the top and how much flap you want to see, as well as where you will place the bottom fold. It's just 2 folds but where you put them is important. You need to have enough flap to close 'over' the top opening of the purse.
Now think about your design. What do you have and where will you put it? You have a purse front, a front flap, and you also have a purse back. When the 4" length is flat, you don't realize that there is an UP and a DOWN that you need to be aware of. So with the piece of scrap paper purse, mark it with a pencil while it is folded. Make a number 2 on the front flap as it faces you. Make a number 2 on the purse flap, under the flap. Flip the paper purse over, (flap still at the top), and make a number 2 on the back. Now open your paper purse. Do you see how the number 2 turned upside down on 2 sections? This is now your GUIDE for embellishment, in case you use something that has a direction to it, such as a heart, as well as where you will create your folds.
Step 3:
Before peeling the red liner off be very careful that the O'So Sticky Tape does not double back and stick to itself! Peel off in sections, as before, for extra caution.
It will be TRICKY to get the red liner started for peeling off. Use a heat tool and heat just a corner (make the red liner melt back and provides a grab-spot) or use a craft knife to get the corner started.
Using your paper guide made in Step 2 so that you understand what is up and what is down (once purse is folded), you will now place your embellishments such as confetti, punched shape(s), jewels, whatever you have chosen. Do not place anything where a fold will be; leave fold areas clear so it won't frustrate you later. Also, leave 1/8" free along the flap edge so you can create a little 'hem' in step 5.
With embellishments in place, dip the entire piece of O'So Sticky Tape in a bath of MICRO BEADS! If you want multi colors, you can pre-mix the colors of micro beads or, you may want to dip portions of the purse piece into different solid colors.
Usually we re-dip in micro beads but this time, lay your purse piece on scrap paper (or in a Tidy Tray) and sprinkle it with glitter! The glitter gets into the cracks and adds a fun surprise of sparkle and glitz! Shake off the excess, of course.
Step 4:
Now it's time to reinforce. Using the paper guide made in Step 2, lay a single strip of 1/8" wide O'So Sticky Tape, ON THE INSIDE, exactly where you want the front flap to fold. Peel the red liner from the 1/8" O'So strip. Lay the 1/8" strip of card stock over the 1/8" sticky strip. Place a second strip of 1/8" O'So over the card stock strip. Peel the red liner from the O'So. Cover this strip with more of the leafing / burnish with fingers / dust off excess.
If you plan to add dangles at the bottom of the purse, you need to also reinforce the inside bottom fold. For this part you simply lay the 1/8" tape along the INSIDE, UP TO the bottom fold line. (Example - the fold line is here ________ and the edge of the 1/8" tape bumps right up TO the line, not over the line.)
Step 5:
The seams are also done with 1/8" tape. Open the purse to flat position, inside of purse facing up. The TOP of the purse should be at the top of the table. The bottom of the purse is closest to your body.
Note: The tape is going to be on the INSIDE of your purse, not the beaded side.
The bottom FOLD line is the START line for placing a strip of 1/8" tape, extending downward until you reach the edge of the purse piece. Place a strip of 1/8" tape on the right side, snip off with scissors at the edge; place a strip on the left side, snip off with scissors at the edge.
Peel off the red liner on both the right and left side and bring the bottom of the piece up, folding at fold line, then secure it in place. You have just created a pocket.
Run a strip of 1/8" tape along the very edge of the purse flap. Remove the liner and press this edge back, creating a hem. You may want to place a dangle here later on and it's up to you if you want to reinforce this hem with cardstock, but I have found it's not as crucial to do so as it is with the handle and bottom dangles which are more susceptible to yanks of little hands (or big hands).
Step 6:
Now we'll add the jump rings to attach the chain or cording as the handle of the purse.
You need to put holes in first. The hole is to be just big enough to get a jump ring through it.
For those with a Japanese screw punch: If you are using a Japanese screw punch, you need a 1.0 mm bit (1/16" diameter, very small.) You also need a cutting mat. Use the JSP very carefully on this delicate piece of artwork you've created. The screwing motion must be slower than with card stock and you will need to pump the JSP up and down several times to get through the layers.
For all others: I do not recommend that you use a hand-held hole punch. It will get caught and then you have a high risk of tearing the piece. You can create a hole by using a fat needle or an awl. If you are using an awl, be very careful because that could end up too big of a hole if you pierce all the way through. Heavy Duty awls used in bookmaking are not recommended but the smaller awls will work well.
Make 2 holes on the INSIDE of the purse so you can land dead center on the 1/8" card stock strip. BE SURE that you are at LEAST 1/8" from the outer side edge. If you get too close to the edge, your handle will rip out.
Now you have 2 holes made, one on each side of the top FOLD area.
Step 7:
With 2 holes made in top fold area, you are ready to insert the jump rings.
Never open a jump ring by pulling the circle apart into a U shape. It will never return to it's position after it's been in a U. Rather, you bend ONE side of the circle to the right or the left. This is usually very easy to do with your fingers. Bend it just far enough so that you can get it to 'coil' around into the hole you've made. Once in, attach the end of your chain into the jump ring. Now bend the jump ring back into original position to close.
Put a jump ring on the other side of the purse and attach the other half of your handle.
If you are using cording rather than chain, you can invent your own version of attachment or you can still use the jump rings and slip your cording through them, then add a bead onto the cord before you tie it so it will remain anchored through the jump ring.
You are DONE - if you want to be! Or, you can move forward into SUPER EMBELLISH MODE!!!!
Step 8:
SUPER EMBELLISHMENT MODE
Taking the beaded amulet bag/purse to the next level here. If you like the look of dangles along the bottom of the purse or on the flap, you will need the jewelry making tools and supplies given in the supply list.
For along the bottom, decide how many dangles you want. Three is good and five is wowza. It's fun to stagger the lengths of the dangles, too. The sky is the limit on colors of beads and design and once you get a feel for this, you may go nuts with it, like I did. Bugle beads, seed beads, teardrop beads, go for some ultra creativity!
Place jump rings along the bottom in the same fashion as you placed them for the handle attachment, remembering to stay about 1/8" away from the sides and bottom edge. You want the jump rings to have a good hold but you also want the beads to dangle and not hang-up. Practice will perfect this.
After inserting the jump rings that you will leave in opened position for now, set the purse aside while you create the dangles.
The 2" head pins have a head on one end that will catch a seed bead when you slip it on. If you want to get fancy, you can snip off the head and create a coil on the end, or even an "eye" so that you can add another jump ring and another head pin for lots of dangle.
Let's start with a basic dangle:
Slip a few beads onto the pin. You can use bugle beads, too. Leave enough of the pin free to complete the next step, about 1/2" for your first time.
1. With the very tips of the pliers, pinch onto to the pin, 1/4" from the end. Pinch it firmly and bend it to the right (if right-handed) until you reach a 90 degree angle. It will look like a T with half the top missing if you've done this correctly.
2. Read this step slowly and catch the detail. Hold the needle nose pliers in your hand so that your thumb is on the top, toward your face, as if you were about to shake hands with someone.
3. Now, rotate your wrist backwards, so that your thumb ends up on the bottom and your 4 fingers are toward your face. You are holding the pliers in the correct position now. (If you rotated your hand in the wrong direction, your arm will be cocked in a most awkward position. Try the other direction.)
4. You are going to create the eye: pinch the very tip of the pin with the very tips of the pliers. Your hand is rotated backwards and you will pinch very firmly, tips to tip. Keeping the grip tight, rotate your hand back to 'shaking hand' position while holding the pin firmly in the other hand. You are making the eye that will slip over the jump ring. The end of the pin should look like a loop that comes around and meets the straight of the pin. If it got a little crooked, mess with it until you're happy.
I hope I've been able to describe this in a manner you can understand. After you've made one, the next will be easier, and so on. Create all the dangles you want to attach to your purse, laying them down in front of you as you make each one so that you can compare the ones that should match (such as the two outer dangles if creating a staggered row). Once all the dangles are made, then you can slip them onto the jump rings and close each jump ring.
The flap dangle will be made in the same manner, should you choose to do so.
Examples
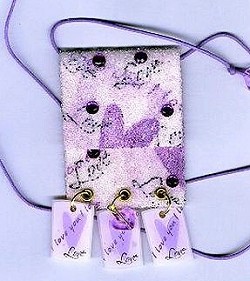
Anna Justice
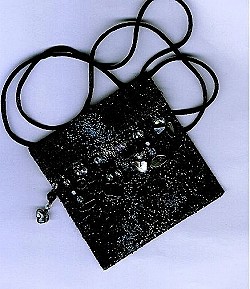
Anna Justice
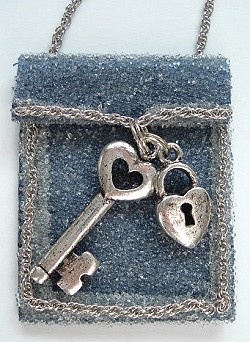
Camela Gertner
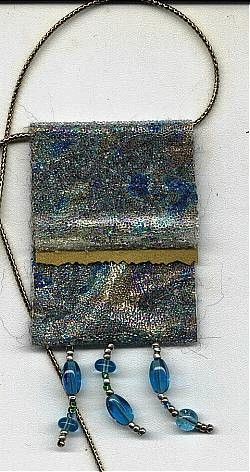
Marianne Colschen